Tag Archives: Error

How to: Enable SharePoint 2013 Central Administration when it displays “HTTP Error 503. The service is unavailable.”

SharePoint-2013

So this issue threw me off at the beginning as I had just freshly installed a SharePoint 2013 server and who would possibly expect that right out of the box the thing won’t work. Regardless, after doing some digging in the event logs and on IIS it turns out the SharePoint application pools were stopped as the domain user I had provided for some reason didn’t have enough permissions to run as a service / batch job. As you can imagine, all you need to do at this point is give that user the right permissions and you are good to go. Be sure to check you have the right username/password and that the account is not locked too!

  • Open the “Local Security Policy” however you can (Windows 2012 you can just hit the Windows key and type that or for older versions go to: Control Panel >> Administrative Tools >> Local Security Policy)
  • Go to Security Settings
  • Then Local Policies
  • Finally User Rights Assignment
  • There you will find “Log on as a batch job”. Go in there and add the user you set up on your SharePoint 2013 installation!

Rumor has it this issue appears on SharePoint 2010 as well and the steps to resolve it are the same.

Installing SQL SERVER 2012 (for SharePoint 2013)

SQL Server

To install SQL SERVER 2012 we are using the following Setup file:

#####_SQLServer2012EnterpriseEditionwithSP1_ServerCAL(With_#########)_x64

Right Click and Mount, Run “setup” Application file as Administrator:

Note: We are logged in as [SharePoint Admin] for all installations.

This Screen will Show up:

Microsoft SQL SERVER 2012 Installation 1

Click “Installation” on the left side, the following screen will come:

Microsoft SQL SERVER 2012 Installation 2

Click “New SQL Server stand-alone installation or add features to an existing installation”, the following screen will come:

Microsoft SQL SERVER 2012 Installation 3

Click “Show Details” to view details, Click “OK” after verifying the setup support rules. In case there is a problem resolve it and Re-run the Setup. Now the following screen appears:

Microsoft SQL SERVER 2012 Installation 4

Wait for some time, the following screen will come:

Microsoft SQL SERVER 2012 Installation 5

In the product key section, Select “Enter the Product Key” which should be 25 character key. Click next, the following screen will come:

Microsoft SQL SERVER 2012 Installation 6

In the license Terms section, Select “I accept the license terms” and Select Send feature usage data to Microsoft….. Click next, the following screen will come:

Microsoft SQL SERVER 2012 Installation 7

Click Next to “Include SQL Server product updates”:

Microsoft SQL SERVER 2012 Installation 8

After the above screen, a prompt as shown below will appear for restarting the system:

Microsoft SQL SERVER 2012 Installation 9

After restart run the setup again and reach to the below screen:

Microsoft SQL SERVER 2012 Installation 10

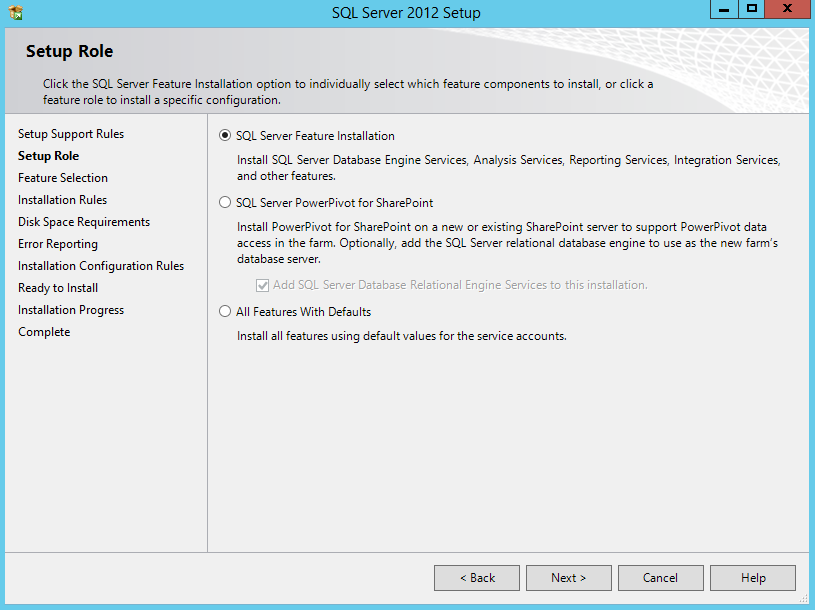
When the Setup Support Rules screen pops up review any errors or warnings you get. If nothing bad has happened the Next button will be available to click. Click Next to view the following screen:

Microsoft SQL SERVER 2012 Installation 11

For Setup Role select SQL Server Feature Installation and click next.

Microsoft SQL SERVER 2012 Installation 12

On the Feature Selection screen this is where you need to be smart. In order to make SharePoint run you only need to select one check box, Database Engine Services. I would highly recommend you also check Management Tools – Basic and Management Tools – Complete. Click Next to view the following screen:

Microsoft SQL SERVER 2012 Installation 13

Wait for some time, the following screen will come:

Microsoft SQL SERVER 2012 Installation 14

Now when you read all of these awesome features you might be thinking “I want to kick the tires of Reporting Services – SharePoint” or some other random feature. That is great, tire kicking is fun and important but if you are reading the blog post to get SQL Server installed correctly for SharePoint then you probably aren’t ready to start randomly installing features. Even if you were ready to install them you would still most likely come back and do them after SharePoint was up and running, not before. So let’s ignore them for now and click next.

On the Installation Rules screen SQL will make some checks. In this case my Server did not have the Microsoft .NET Features installed. You will need to manually add the feature now. While you do go ahead and leave this SQL window open.

To add the .NET Windows Server feature click on Start > All Programs > Administrative Tools > Server Manager.

From the right side of the screen click on Features.

Over on the left side of the screen click on Add Features.

Check the box for .NET Framework 3.5.1 Features.

When you check the box a window for Add Features Wizard will appear telling you the additional required roles. Click Add Required Role Services.

Click Next.

At the Web Server (IIS) screen click Next.

Accept all of the defaults and click Next.

At the Confirm Installation Selections click Install.

At the Installation Results screen make sure everything was successful and then click Close.

Jump back over to your SQL Installation Rules screen and click the Re-run button.

If the tests are Passed click Next to continue.

After Installation Rules the Following screen appears:

Microsoft SQL SERVER 2012 Installation 15

Assuming this is the only install of SQL Server on this server then you are going to want to take all of the default settings for the Instance Configuration screen, but in my Case I have updated the name to be my server, Click Next.

Microsoft SQL SERVER 2012 Installation 16

Wait for some time, the following screen will come:

Microsoft SQL SERVER 2012 Installation 17

At the Disk Space Requirements screen click next.

Microsoft SQL SERVER 2012 Installation 18

For the Server Configuration screen it is asking you what accounts you want to run SQL Server as. The only service you are worried about right now is the SQL Server Database Engine. This service should always be run as a domain account not a local account. Next to SQL Server Database engine click on MANAMA1\spadmin and a drop down arrow will appear.

Click <<Browse…>>.

Select your SQL account you want to use and click OK.

Enter the account password and keep the startup type as Automatic click next.

Microsoft SQL SERVER 2012 Installation 19

Wait for some time, the following screen will come:

Microsoft SQL SERVER 2012 Installation 20

On the Database Engine Configuration screen there are lots of changes you could make and over time you will learn about these options but for the purpose this guide you will except all of the defaults. You only need to click Add Current User and it is shown as.

Microsoft SQL SERVER 2012 Installation 21

If you were building a production capable SQL Server best practice 101 would be to store your data and log files on different volumes. By default SQL Server will store everything on the C: drive. If you want change that behavior take a gander at the Data Directories tab.

Once you are ready click next the following screen appears:

Microsoft SQL SERVER 2012 Installation 22For the Error Reporting screen select Send Windows and SQL Server Error Reports…Click next the following screen appears:

Microsoft SQL SERVER 2012 Installation 23

At the Installation Configuration Rules screen click next.

Microsoft SQL SERVER 2012 Installation 24

You are ready to Install, so click Install.

Microsoft SQL SERVER 2012 Installation 25

Wait for some time, the following screen will come:

Microsoft SQL SERVER 2012 Installation 27 After Restart

When the installation finishes you may be prompted to restart. This is not directly because of SQL Server but instead because of other recent installs you have done that you haven’t rebooted since. In my case because I added the .NET feature. When SQL is all done click close. If you have any other open windows at this point you can close them as well. You are all done.

If you got the pop up screen to do a reboot it will not automatically happen, you will need to reboot on your own.

Microsoft SQL SERVER 2012 Installation 27 After Restart

Note: The Above error is due to Installation of .Net Framework 3.5, after resolving this when you run the setup again you receive the following screen:

Microsoft SQL SERVER 2012 Installation After Installing NetFx3

Now the SQL SERVER 2012 is successfully installed.

Now do what is mention in this post: Max Degree of Parallelism for SQL SERVER 2012 (before installing Sharepoint 2013)

Now do what is mention in this post: Starting/Running SQL SERVER 2012 (SQL Permissions) for SharePoint 2013

Now you have your whole SQL Server ready, so you can install SharePoint 2013.

SharePoint 2010: Error 7043

SharePoint 2010: Error 7043 “Load control template file /_controltemplates/TaxonomyPicker.ascx failed”

SUMMARY

You install Microsoft Sharepoint 2010 RTM on Windows 2008 R2, you receive the following error message multiple times in the application event log:
Event Type: Error
Event Source: SharePoint Foundation
Event Category: None
Event ID: 7043
Computer: SERVERNAME
Description: Load control template file /_controltemplates/TaxonomyPicker.ascx failed: Could not load type ‘Microsoft.SharePoint.Portal.WebControls.TaxonomyPicker’ from assembly ‘Microsoft.SharePoint.Portal, Version=14.0.0.0, Culture=neutral, PublicKeyToken=71e9bce111e9429c’.

CAUSE
The ULS log is created in a code path where all control templates are loaded into the web application. This is a one time process which happens just before showing any UI to the user after an IISReset.
The source of the problem looks like a stale control template in the control templates folder while the control itself has been removed from the code base.

RESOLUTION
This is not causing any issues except for a wrong ULS log message a single time in a web application process life time, the exception is caught and that template file is skipped. This message should be treated as log noise and can be ignored.
To change this behavior:

  1. Navigate to /14/TEMPLATE/ControlTemplates/TaxonomyPicker.ascx user control
  2. Open the user control in a text editor and locate the first line
  3. Find the character string , and replace with a comma ‘,’ (without quotes).
  4. Save the user control

Outlook Calender Connection to SharePoint did not work after server move

An issue came up lately where a clients site collection was moved from one server to another. The client had set up some SharePoint to Outlook connections to some calendar lists on their original server. These connections no longer functioned in Outlook after this move. Read more on this functionality here

Here is the steps to resolve the calendar issue.

Errors
Errors seen in the Outlook when attempt to sync
“Task ‘SharePoint’ reported error”
“Outlook cannot connect to the SharePoint List”
“The server may not be reachable from your location.”

Notes of Analyse
• A calendar connection is established from the SharePoint side and not from Outlook.
• The server location has changed because of the forced move to Project Hosts.
• I investigated the possibility of changing the connection detail within Outlook. It appears not to be possible.
• Therefore to resolve this we must remove the calendar in Outlook and then re-establish the connection.
• *Any Items which had been added to the calendar on the Outlook side since it stopped synchronising, are in danger of being lost unless these appointments added to the SharePoint calendar before we re-establish the connection.

Resolution Steps
1. Complete the * task above first.
2. In Outlook choose File then choose click Account Settings

C3-300x131

3. Choose the SharePoint Lists tab and then choose the list name like below (Calendars are classified as lists in SharePoint).
4. Finally Choose Remove

C4-300x244

5. Reference your calendars in Outlook and note that the calendar has been removed.
6. Now simply return to the calendar list in SharePoint and choose Connect to Outlook

C5

7. You may receive a similar message as below.

C6-300x227


That should now resolve the issue.

Ref : Bright Work Support

SharePoint 2013 App.master Error

This video demonstrates how to reproduce the current bug in SharePoint 2013 which destroys your apps when changing the master page.

Pre-requisites: Publishing Infrastructure enabled on the Site Collection, Publishing enabled on the site hosting the app.

Steps:
1) add App
2) change masterpage of site using the app
3) make sure tou tick the reset all sub sites option
4) try to administer the app..Oops.

Source Problem:
When an app is added to your site, a separate subsite is created to host the app. Although this subsite is hosted in a completely different URL, it is still treated as a subsite of your main intranet. So when you go ticking the reset all sub sites box, all existing apps will lose their default masterpage and will receive a reference to the new masterpage. This obviously can’t happen, as that would mean the app could access resources outside of its allowed list and that’s why SharePoint throws the error at you.

Ref : SharePoint 2013 App.master Error

Excel Services: Unable to process the request

Error

This error message appeared in a SharePoint 2010 farm/environment when trying to use Excel Services to display a Excel spreadsheet in SharePoint 2010.

image_thumb

Excel. Unable to process the request. Wait a few minutes and try performing this operation again.

After reviewing the Events and log files and finding error messages such as these:

image_thumb2


Event Viewer: Event 5239, Excel Services Application. There was an error in communicating with Excel Calculation Service (server address on port 32843, standard port for web services address ending with /ExcelService*.asmx) exception: The underlying connection was closed: An unexpected error occurred on a receive.

Issue

The issue was that the web site used for the SharePoint Web Services had the ASP.NET Impersonation Authentication method enabled.

Solution

The solution is to disable the ASP.NET Impersonation again.

Go to IIS Manager (Start, Administrative Tools, Internet Information Services (IIS) Manager). Expand the Sites node on the server running the Excel Services Service Application. Choose the Authentication icon in the IIS area. Choose ASP.NET Impersonation in the list and disable it using the action link on the right hand side.

image_thumb3

IIS Manager, Authentication settings for the SharePoint Web Services.

Ref : Stefan Johansson

Difference between Event and Trace Log

Event log: 

It records diagnostic information generated by Microsoft Business Connectivity Services. It also records error messages.

Trace log: 

It also records diagnostic information generated by Microsoft Business Connectivity Services. It contains more in-depth information, such as stack traces and informational messages. The trace log gives more-in-depth information than the event Log.

Reference: Search 2010 Architecture and Scale - Part 1 Crawl

WebFldr (explorer view) SharePoint explorer does not display

Problem: Please wait while Explorer View is loaded. If Explorer View does not appear, your browser may not support it

In SharePoint, if your “Explorer View” doesn’t work and give “Please wait while Explorer View is loaded. If Explorer View does not appear, your browser may not support it.” error then please make sure your “WebClient” service is up and running as shown in below screen clipping:

Also make sure you are running the service with “Local Service” account.

For more info view this post : IIS WebDAV service required for SharePoint webdav

SharePoint “Crawl Log error: Access Denied”

Issue
Windows Server 2003 SP1 introduced a loopback security check. This feature is obviously also present in Windows Server 2008. The feature prevents access to a web application using a fully qualified domain name (FQDN) if an attempt to access it takes place from a machine that hosts that application. The end result is a 401.1 Access Denied from the web server and a logon failure in the event log.

1. Login to the SharePoint server.
2. Click Start, click Run, type regedit, and then click OK.
3. In Registry Editor, locate and then click the following registry key: HKEY_LOCAL_MACHINE\SYSTEM\CurrentControlSet\Control\Lsa

4. Right-click Lsa, point to New, and then click DWORD Value.
5. Type DisableLoopbackCheck, and then press ENTER.
6. Right-click DisableLoopbackCheck, and then click Modify.
7. In the Value data box, type 1, and then click OK.
8. Quit Registry Editor, and then restart your computer.

However, for production environments, DO NOT DISABLE this feature. You are unpicking a serious security check of the OS. If that environment underwent a security audit by a competent security engineer, it would be flagged. You should add a list of addresses you wish to exclude. This makes your scenario work whilst retaining the security check.

1. Login to the SharePoint server.
2. Click Start, click Run, type regedit, and then click OK.
3. In Registry Editor, locate and then click the following registry key: HKEY_LOCAL_MACHINE\SYSTEM\CurrentControlSet\Control\Lsa\MSV1_0
4. Right-click MSV1_0, point to New, and then click Multi-String Value.
5. Type BackConnectionHostNames, and then press ENTER.
6. Right-click BackConnectionHostNames, and then click Modify.
7. In the Value data box, type the host name or the host names for the sites that are on the local computer, and then click OK.
8. Quit Registry Editor, and then restart the IISAdmin service.  (Or Recycle the App-Pool).

Ref: http://support.microsoft.com/kb/896861

SharePoint Search Crawler Error After Installing .NET 3.5 SP1

I installed Microsoft .NET 3.5 SP1 on SharePoint 2007 today, which was a prerequisite for an updated 3rd party application that we use with SharePoint. After the upgrade, I attempted to perform a Full Crawl but the crawl only took a few seconds and only Access Denied errors were displayed in the crawl log. After investigating the Event Viewer on the SharePoint Search server, the following error was found:

Event Type: Warning
Event Source: Office Server Search
Event Category: Gatherer
Event ID: 2436
Date:  1/27/2011
Time:  10:29:16 PM
User:  N/A
Computer: SHP1
Description:
The start address http://intranet.contoso.com/ cannot be crawled.
Context: Application ‘SSP’, Catalog ‘Portal_Content’
Details:
Access is denied. Verify that either the Default Content Access Account has access to this repository, or add a crawl rule to crawl this repository. If the repository being crawled is a SharePoint repository, verify that the account you are using has “Full Read” permissions on the SharePoint Web Application being crawled.   (0x80041205) For more information, see Help and Support Center at

http://go.microsoft.com/fwlink/events.asp.

After some investigation, A fix was found in KB896861 by adding theDisableLoopbackCheck key to the registry. Once the registry key was added and the IIS Admin service was restarted, I attempted to perform another full crawl and this time it was successful!

Ref : http://support.microsoft.com/kb/896861