Tag Archives: EDITOR

How to Identify the Version and Service Packs installed on a SharePoint 2013 Server

In many cases, we may not be bothered about the Version, Service Packs installed on our Server when we do the development. It is obvious that, when we get the requirement, immediately we will start analysis the requirement.

But recently there was a situation that one of our client wants to move on to the new Service Pack which released on this April. In that case, we may also have to analyze the impact of the new Service Pack. Before knowing that, I just wanted to know, what are the things installed on our Dev environment first. Then on top of it, what needs to be installed and what would be the impact after installation.

To answer all these questions, First we need to know what is the version installed on our Farm. Use the following command to get the Version of the product installed using PowerShell script.(Get-SPFarm).Products.

First Run ISE as below :

Run_ISE_as_Administrator

Then after selecting the Commands of “Add.PSSnapin” output of the above command will be something like,Get-SPFarm_Products

By seeing the GUID, we will be able to identify the Product. These GUIDs will not change. On all the environments, and all the machines, the GUIDs will remain same.

Here are all of the product GUIDs:

GUID : 35466B1A-B17B-4DFB-A703-F74E2A1F5F5E Product : Project Server 2013

GUID : BC7BAF08-4D97-462C-8411-341052402E71 Product : Project Server 2013 Preview

GUID : C5D855EE-F32B-4A1C-97A8-F0A28CE02F9C Product : SharePoint Server 2013

GUID : CBF97833-C73A-4BAF-9ED3-D47B3CFF51BE Product : SharePoint Server 2013 Preview

GUID : B7D84C2B-0754-49E4-B7BE-7EE321DCE0A9 Product : SharePoint Server 2013 Enterprise

GUID : 298A586A-E3C1-42F0-AFE0-4BCFDC2E7CD0 Product : SharePoint Server 2013 Enterprise Preview

GUID : D6B57A0D-AE69-4A3E-B031-1F993EE52EDC Product : Microsoft Office Web Apps Server 2013

GUID : 9FF54EBC-8C12-47D7-854F-3865D4BE8118 Product : SharePoint Foundation 2013

And to know about the Service Packs, there is no need of any PowerShell Commands. That we can directly go to the Central Administration and find.

Go to Central Administration.image1

Click on “Upgrade and Migration” on the Quick Links. image2

Click on “Check Product and Patch Installation Status”image3

This will tell us the current Patches Installation. By seeing the Version column we can identify. On the screen shot above shared, there is no SP installed.

Visual Studio .NET Code Editing Tips & Tricks

While surfing the net, I bumped up an interesting document that contains tips & tricks to increase your productivity in Visual Studio .NET.

VSDOTNETCodeEditingTipsAndTricks (Pdf)

Note : Most of the tips in the article are handy shortcuts.

Creating and using code snippets

I really like working in Visual Studio, and love the new features and user friendly tips and tricks to make my work more easy, today i would share one of the features that I really appreciate in Visual Studio is “code snippets”. Code snippets help you to speed up the development by giving you shortcuts to frequently used code.

For example if you want to create a for loop, you simply type for and press the “TAB” button twice.

Visual Studio will then automatically generate the code for you as you can see below.

By using the tab key, you can navigate to the marked words which enables to specify your own names.
That’s not all. The nicest thing about code snippets is that you can create your own code snippets.
In the following example, I’ll show you how.
Create a new file cend.snippet within Visual Studio 2005 and save it under the …\My Documents\Visual Studio 2005\Code Snippets\Visual C#\My Code Snippets folder.

Copy the following code in the file, I’ll explain the code in a minute:

<!–?xml version=”1.0″ encoding=”utf-8″ ?>
<CodeSnippets xmlns=”http://schemas.microsoft.com/VisualStudio/2005/CodeSnippet”&gt;
<CodeSnippet Format=”1.0″>
<Header>
<Shortcut>cend</Shortcut>
<Title>End console</Title>
<Description>Code snippet for ending a console application</Description>
</Header>
<Snippet>
<Declarations>
<Literal>
<ID>EndMessage</ID>
<Default>Press any key to continue … </Default>
</Literal>
</Declarations>
<Code Language=”CSharp”>
<!–[CDATA[
Console.WriteLine(“$EndMessage$”);
Console.ReadLine();
]]>
</Code>
</Snippet>
</CodeSnippet>
<!–CodeSnippets>

Save the file and open a C# application. In one of the .cs files, type cend which will popup the intellisense menu.

When you press the “TAB” key twice, the following code will be generated:

How does it work:
The second line in the snippet file informs Visual Studio to use an xsd to help you by providing intellisense (the xsd is located in C:\Program Files\Microsoft Visual Studio 8\Xml\Schemas\1033\snippetformat.xsd depending on where you installed VS):

xmlns=”http://schemas.microsoft.com/VisualStudio/2005/CodeSnippet”&gt;

The shortcut contains the shortcut that you can use to reference to your code snippet. You can also reference the code snippets via the menu or via the Ctrl+K, Ctrl+X combination.

A literal is a variable that can be used within your code snippet. When using the code snippet, each literal is a placeholder for user input. You can add a default value as done in the sample.

Within the code element, comes the real code snippet. It is embedded in a CDATA element to be able to include special elements in the xml document.

It is also possible to create multiple snippets (1 snippet per file) 🙂

Reference : Geert Verhoeven Blog

ULSViewer tool

Are you already using ULSviewer tool? Great! If not, please download your copy from the following site:

ULS Viewer

It is an excellent tool to read error messages from the SharePoint logs. You may have noticed that SP 2010 throws an error with correlation ID which is meaningless for the users. It doesn’t tell anything to the user about the error. You can use ULSviewer to search the error in the logs using the correlation ID. Error log gives you complete description of the error.

PowerShell Demo Tools

Several people who attended my PowerShell talk at SPC09 have been asking for the “Start-Demo” Script I used to demo PowerShell commands without having to type them in front of a live audience.  

The script I used is really just a slightly modified version of this one 

http://blogs.msdn.com/powershell/archive/2007/06/03/new-and-improved-start-demo.aspx 

iI recommend just using the version provided by the PowerShell team.

Also, I recommend pairing this with the Sysinternals tool ZoomIt to allow for zooming and underlining elements on the screen.

This is a free tool available from the Sysinternals website: http://technet.microsoft.com/en-us/sysinternals/default.aspx

PowerShell Scripting Editor

If you’re anything like me, you like to script in an organized fashion. Notepad just doesn’t quite do it for me, so be sure to check out the new PowerGUI Script Editor (comes with PowerGUI), which has built in intelli-sense and color coding!

Insert JavaScript into a Content Editor Web Part (CEWP)

In the 2007 version of SharePoint, we had the Source Editor included in the Content Editor Web Part as our way of inputting JavaScript directly onto a page. The process on how to do this has changed a little bit in the new 2010 version. Follow below on how to successfully perform the same task.

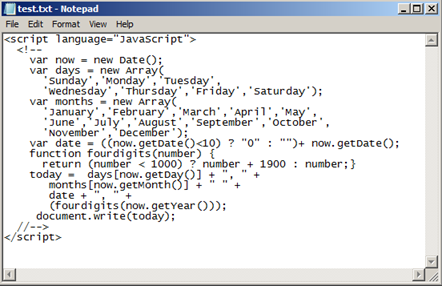
Instead of having a Source Editor to directly paste in our code, we need to first create a simple text file and paste and save our code there. Once saved, upload that file to SharePoint. I am using the Site Assets library for this demo and a JavaScript that displays today’s date. After you have uploaded the file, right-click on the file and select Copy Shortcut.

Now, go to your desired page and put the page in edit mode. Add in the Content Editor Web Part located under the Media and Content category. Once added select the web part and use the ribbon UI to navigate to the Web Part Properties screen.

On the web part properties screen, paste in the URL link to your uploaded JavaScript file. Click Ok on the properties screen and, if your JavaScript is valid, it should display the desired results! Simple and easy!

Ref : Insert JavaScript into a Content Editor Web Part By sptwentyten

Custom Styles for SharePoint 2010 Rich Html Field

A typical requirement from a client is to be able to incorporate their own custom styles for the Rich Html Field. Allowing their public relations department to apply nice text formating for paragraphs with some Comic Sans Hotness might not be the best practice in here, so let’s be careful out there. The best scenario is only to allow custom formatting for headings, paragraphs and maybe a few different table styles but let’s go!

First, open up the page layout containing the HTML editor and add PrefixStyleSheet property for the RichHtmlField:

<PublishingWebControls:RichHtmlField id=”Content” FieldName=”PublishingPageContent” PrefixStyleSheet=”my-rte” runat=”server” />

Now, the default value for the property is ms-rte. We are going to redefine this to my-rte. Do not use any uppercase characters in the property value as apparently those wont work. Deploy the page and open it in edit mode to see the desired effect. The styles collections are now empty in the Ribbon.

We now have to define our own styles prefixed with the string my-rte. I’d suggest that you put these style declarations in a separate stylesheet to avoid javascript errors caused by complicated and hard-to-parse stylesheets. Let’s name our new stylesheet rte.css and add a few declarations there.

The Markup Collection

Let’s say I want to have an option to add a level 1 heading or an H1 tag for the given page via the Markup Styles dropdown list:

Step 1 – introduce the tag:

H1.my-rteElement-H1 { -ms-name:”my level 1 heading”; }

Step 2 – add the styles to the tag:

.my-rteElement-H1 { font-size: 150%; }

Save the rte.css and make a reference for it in your master page, page layout or even use an alernative css. If you want your clients to be able to edit the styles themself, you could upload the rte.css in the Style Library and reference it there.

I have saved the file directly in the 14-hive /_layouts/my/ -folder and use a quick reference in the master page:

<SharePoint:CssRegistration ID=”CssRegistration1″ runat=”server” Name=”/_layouts/my/rte.css” />

Deploy and reload the page, fire up the edit mode and navigate to the ribbon where you can see your new style in action.

Adding new elements is easy once you get to know the logic. Here’s an example of a parapgraph with nice rounded corners and superb font on modern browsers (note that I have combined the introduction and style values in one declaration):

P.my-rteElement-P { -ms-name:”My CSS Rounded Paragraph”; background: #808; color: #fff; border: 3px solid #f0f; text-transform: uppercase; text-align: center; -webkit-border-radius: 10px; -moz-border-radius: 10px; border-radius: 10px; box-shadow: 0 0 20px #000; -moz-box-shadow: 0 0 20px #000; -webkit-box-shadow: 0 0 20px #000; padding: 10px; font: bold 2em Comic Sans MS; }

The Styles Collection

The Styles collection can be populated with the same way by changing the Element-suffix into Style ie.:

.my-rteStyle-MePinky { -ms-name:”I am pink”; color: #f0f; }

Other Items

I’d suggest that you check out the default HTML editor styles in /Style Library/en-us/Themable/Core Styles/htmleditorstyles for quick reference how to style the other elements, including table styles on the Ribbon.

Ref : Custom Style by Tuukka Uskali