Category Archives: Javascript

Using jQuery validation in a sharepoint web part

As we all know, a SharePoint page can only have one <form > tag in it. As anyone who wanted to use jQuery validation knows, the validation script needs to run on a form tag.
So how do I use the validation code in a sharepoint web part?

The answer is to run the script against the form that already exists in the page. For example, I had to write a web part with an email address field, and wanted to help the users by validating the text they entered is a valid email address on the client side (I also validate on the server side – just in case someone is running a browser with no script). This is the “Render” override code that I used:

txtEmailAddress1.CssClass = “required email”;

       base.Render(writer);
       if (SPContext.Current.FormContext.FormMode != Microsoft.SharePoint.WebControls.SPControlMode.Edit)
       {
              writer.Write(@"<script>
$().ready(function() {
    $(""#" + this.Page.Form.ClientID + @""").validate();
});
</script>
");
       }

As you can see, I am adding a css class of type “required email” for the text box, and then telling the form on the page to validate using the jquery validation plug in. This of course assumes you added the references to the jquery scripts to the page…which you may want to do as part of the web part (override oninit, and registerclientscriptblock) or as part of the master page (if you expect a lot of web parts to use it).

As for the “if (SPContext.Current.FormContext.FormMode != Microsoft.SharePoint.WebControls.SPControlMode.Edit)” line – you have to be careful that your validation does not prevent you from editing the page. For example, if you remove that “if”, you will not be able to change the properties of any web part on the page without first entering a valid email address in the textbox!
Ref : Sharepoint Tips And Tricks

The Best Way to Add Custom JavaScript and jQuery to SharePoint

During extensive SharePoint user interface customization you’ll likely encounter a scenario where you need to make a web part or user control do something it was not intended to do or have a look that cannot be accomplished using the CSS hooks provided out-of-the-box. The solution is to create a custom master page and include a reference to a JavaScript file where you can modify the Document object. While straight JavaScript will do, I prefer to use the jQuery JavaScript library, which is far more robust, easier to use, and allows for plugins. Follow the steps below to add jQuery to your master page.

  1. Go to jquery.com and download the latest jQuery library to your desktop. You want to get the compressed production version, not the development version.
  2. Open SharePoint Designer (SPD) and connect to the root level of your site’s site collection.
  3. In SPD, open the “Style Library” folder.
  4. Create a folder named “Scripts” inside of the Style Library.
  5. Drag the jQuery library JavaScript file from your desktop into the Scripts folder.
  6. In the Scripts folder, create a new JavaScript file and name it (e.g. “actions.js”).
  7. Open your master page file in SPD.
  8. Within the <head> tag of the master page, add a script reference to the jQuery library just above the content place holder named “PlaceHolderAdditonalPageHead” (and above your custom CSS references, if applicable) as follows:
    // <![CDATA[
    src=”/Style%20Library/Scripts/{jquery library file}.js” type=”text/javascript”>
    // ]]>
  9. Immediately after the jQuery library reference add a script reference to your custom scripts file as follows:
    // <![CDATA[
    src=”/Style%20Library/Scripts/actions.js” type=”text/javascript”>
    // ]]>

Your custom master page now includes jQuery and a reference to your custom scripts file where you can add jQuery scripts. SharePoint includes a number of JavaScript files throughout the site, so be careful that the scripts you add do not conflict with SharePoint’s; the jQuery library itself does not conflict with SharePoint.

Javascript from within CSharp

This is how you can write JavaScript from within c#:

if (dtStart.SelectedDate != dtEnd.SelectedDate){Response.Write(@”<script language=’javascript’>alert(‘Start date must be equal to end date. Only hours and minutes can be different.’);</script>”);}

Insert JavaScript into a Content Editor Web Part (CEWP)

In the 2007 version of SharePoint, we had the Source Editor included in the Content Editor Web Part as our way of inputting JavaScript directly onto a page. The process on how to do this has changed a little bit in the new 2010 version. Follow below on how to successfully perform the same task.

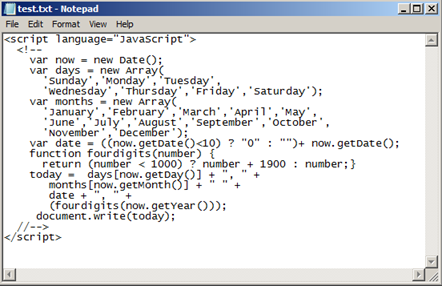
Instead of having a Source Editor to directly paste in our code, we need to first create a simple text file and paste and save our code there. Once saved, upload that file to SharePoint. I am using the Site Assets library for this demo and a JavaScript that displays today’s date. After you have uploaded the file, right-click on the file and select Copy Shortcut.

Now, go to your desired page and put the page in edit mode. Add in the Content Editor Web Part located under the Media and Content category. Once added select the web part and use the ribbon UI to navigate to the Web Part Properties screen.

On the web part properties screen, paste in the URL link to your uploaded JavaScript file. Click Ok on the properties screen and, if your JavaScript is valid, it should display the desired results! Simple and easy!

Ref : Insert JavaScript into a Content Editor Web Part By sptwentyten